Relational Database Schema Documentation
Deprecated
Introduction
This documentation provides an overview of our database schema designed for managing devices and sensors. The database is implemented using Amazon RDS (Relational Database Service), a scalable database service provided by Amazon Web Services for easily setting up, operating, and scaling a relational database in the cloud.
This documentation provides an overview of our specific relational database schema, and how to connect to the Database locally.
Database Schema
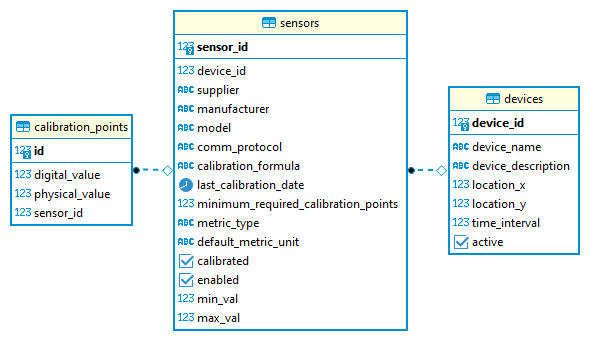
Our schema is composed of three tables.
Tables

Queries (DDL)
The following are basic DDL (Data Definition Language) SQL queries that create the tables in our schema.
CREATE TABLE devices (
  device_id SERIAL PRIMARY KEY,
  device_name VARCHAR,
  device_description VARCHAR,
  location_x FLOAT,
  location_y FLOAT,
  time_interval INTEGER,
  active BOOLEAN
);

CREATE TABLE calibration_points (
  id SERIAL PRIMARY KEY,
  sensor_id INTEGER REFERENCES sensors(sensor_id),
  digital_value FLOAT,
  physical_value FLOAT
);

CREATE TABLE sensors (
  sensor_id SERIAL PRIMARY KEY,
  device_id INTEGER REFERENCES devices(device_id),
  supplier VARCHAR,
  manufacturer VARCHAR,
  model VARCHAR,
  comm_protocol VARCHAR,
  calibration_formula VARCHAR,
  last_calibration_date TIMESTAMP,
  minimum_required_calibration_points INTEGER,
  metric_type VARCHAR,
  default_metric_unit VARCHAR,
  calibrated BOOLEAN,
  enable BOOLEAN,
  min_val INTEGER,
  max_val INTEGER
);
Connecting to the Database Locally
To connect to your Amazon RDS database locally, you can follow these steps:
1. Add your IP Address to the Security Group:
- Sign in to the AWS Management Console and open the Amazon RDS console.
- In the navigation pane, choose ‘Databases’.
- Choose the yvr-configuration DB instance.
- Under ‘Security’ -> ‘VPC security groups’, choose team_local_ip.
- In the details pane, choose the ‘Inbound’ rule for the security group.
- Choose ‘Edit inbound rules’.
- In the ‘Edit inbound rules’ dialog box, choose ‘Add rule’.
- For ‘Type’, choose the database port your DB instance uses. By default, the PostgreSQL port is
5432. - For ‘Source’, type your local IP address. You can choose ‘My IP’ to automatically populate this field.
- For the ‘Description’, type
{Name} Home IP. - Choose ‘Save rules’.
2. Connect to the Database Using DBeaver:
After setting up your security group, you can connect to the database. You can use a SQL client such as pgAdmin, DBeaver, or psql. Here I will use DBeaver as an example:
-
Open DBeaver.
-
Click on ‘Database’ in the top menu, then ‘New Database Connection’.
-
In the ‘New Connection Wizard’ window, select ‘PostgreSQL’ (you can also search for it in the provided search box) and then click ‘Next >’.
-
Fill in the connection settings:
-
Host: This is the endpoint of your RDS instance, which can be found on the AWS RDS instance console.
-
Port: This is the port number your DB instance uses for connections. The default PostgreSQL port is
5432. -
Database: This is the name of your database.
-
User name and Password: These are your database username and password. You can find it in AWS Secrets Manager -> dev/calibration-db.
-
-
Test your connection by clicking on ‘Test Connection…’. If all the settings are correct, you will receive a ‘Success’ message.
-
Click on ‘Finish’ to save the connection.
Now you can interact with your database directly from DBeaver.