Dissolved Oxygen Sensor
Gravity
Table of contents
Summary
A Gravity Analog Infrared CO2 Sensor V1.2:
Name: Gravity: Gravity Analog Infrared CO2 Sensor For Arduino SKU SEN0219
Link: web-archive link Link: google-docs
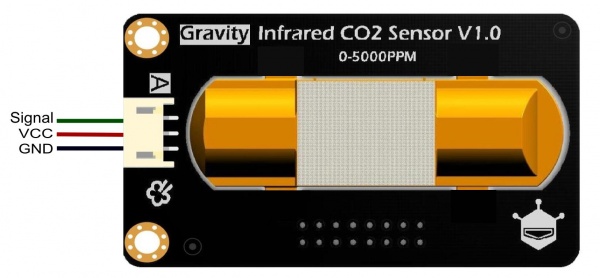
| Num | Label | Description |
|---|---|---|
| 1 | Signal | Analog Output (0.4~2V) |
| 2 | VCC | VCC (4.5~5.5V) |
| 3 | GND | GND |
Calibration: Single-point and two-point.
- Gas Detection: Carbon Dioxide (CO2)
- Operating Voltage: 4.5 ~ 5.5V DC
- Average Current: <60mA @ 5V
- Peak Current: 150mA @ 5V
- Output Signal: Analog output (0.4 ~ 2V)
- Measuring Range: 0 ~ 5000ppm
- Accuracy: ± (50ppm 3% reading)
- Preheating Time: 3min
- Response Time: 120s
- Operating Temperature: 0 ~ 50 ℃
- Operating Humidity: 0 ~ 95% RH (no condensation)
- Service Life: >5 years
- Size: 37mm * 69mm
Calibration
Q. Can I use the CO2 sensor with 3.3V microcontroller?
A. Yes, but you need to power the C02 sensor with 5V power supply seperately, and change the conversion formula * float voltage = sensorValue(3300/1024.0)**
Q. How do I calibrate?
A. The sensor should be calibrated regularly. The cycle time should be no more than 6 months. Manual calibration of zero point is to calibrate the sensor’s HD pin input low level (0V) to calibrate the zero point, and the low level shall last more than 7 seconds.The calibration of zero point is 400 ppm, Please ensure that the sensor is stable for more than 20 minutes at 400ppm.
Method 1: Manual zero calibration Manual calibration of zero point is to short-circuit the HD and GND of the sensor (as shown below) to calibrate the zero point. It always needs to last for more than 7 seconds. Before calibrating the zero point, make sure that the sensor runs stably for more than 20 minutes at a concentration of 400ppm.

Method 2: Automatic zero calibration The automatic calibration function means that the sensor will intelligently judge the zero point according to the environmental concentration and calibrate itself after a period of continuous operation. The calibration cycle starts from power-on operation, and it is automatically calibrated once every 24 hours. The zero point for automatic calibration is 400 ppm. The automatic zero calibration function is suitable for office environment and home environment.
Notes
Define the Arduino pin where the CO2 sensor is connected.
int sensorIn = A0
Inside the loop() function, first read the signal values at the Analog pin of Arduino by calling the analogRead() function. After that, convert these analog signal values to voltage values.
void loop(){
int sensorValue = analogRead(sensorIn);
float voltage = sensorValue*(5000/1024.0);
After that, compare the voltage values. If the voltage is 0 V, it means that some problem has occurred with the sensor. If voltage is greater than 0 V but lesser than 400 V, then it means that the sensor is still in the pre-heating process.
if(voltage == 0)
  {
    Serial.println("Fault");
  }
  else if(voltage < 400)
  {
    Serial.println("preheating");
  }
If the voltage is equal or greater than 400 V, then convert it to CO2 concentration values.
else
  {
    int voltage_diference=voltage-400;
    float concentration=voltage_diference*50.0/16.0;
Print Voltage and CO2 concentration:
// Print Voltage
    Serial.print("voltage:");
    Serial.print(voltage);
    Serial.println("mv");
    //Print CO2 concentration
    Serial.print("CO2 concentration:");
    Serial.print(concentration);
    Serial.println("ppm");
JSON
Publish Topic: device/reading/sensor/co2
{
  value:        # float
}
Subscribe Topic: device/config/sensor/co2
{
  state:          # binary
}