Stress Test
Deprecated
A simple and very crude test to see issues and limitations with data flow in the cloud system. The test will run multiple python scripts in parallel that will imitate buoys sending MQTT messages to their appropriate topic.
It consists of:
- 1 python script to run everything (StressTest.py)
- 30 python scripts to simulate as buoys (buoy100.py –> buoy129.py)
The test should result in 30 buoys * 100 messages * 9 mesaures being sent in total, which is 27000 messages in under 100 seconds.
Please note: due to the crude implementation, if you wish to make changes to the test, you may need to alter all 31 .py scripts
Running StressTest.py
I will not go over obtaining the prerequisites here.
Prerequisites:
- You need SSH access to the EMA_C22-UpdatedPythonGen EC2 instance.
The Stress test is located under the ./yvr-sensor-python/StressTest/ You just need to run the StressTest.py
All the imitation buoy scripts are located under ./yvr-sensor-python/StressTest/scripts
Please do not touch pubsub.py in ./yvr-sensor-python/StressTest/ as it is a script for reference DO NOT DELETE OR ALTER. You may copy, and then alter the copy.
Modifying the StressTest.py
If you wish to make changes to the overall test, you need to modify StressTest.py
import multiprocessing
import os

# Creating the tuple of all processes
all_processes = ('./scripts/buoy100.py', './scripts/buoy101.py', './scripts/buoy102.py', './scripts/buoy103.py', './scripts/buoy104.py',
                 './scripts/buoy105.py', './scripts/buoy106.py', './scripts/buoy107.py', './scripts/buoy108.py', './scripts/buoy109.py',
                 './scripts/buoy110.py', './scripts/buoy111.py', './scripts/buoy112.py', './scripts/buoy113.py', './scripts/buoy114.py',
                 './scripts/buoy115.py', './scripts/buoy116.py', './scripts/buoy117.py', './scripts/buoy118.py', './scripts/buoy119.py',
                 './scripts/buoy120.py', './scripts/buoy121.py', './scripts/buoy122.py', './scripts/buoy123.py', './scripts/buoy124.py',
                 './scripts/buoy125.py', './scripts/buoy126.py', './scripts/buoy127.py', './scripts/buoy128.py', './scripts/buoy129.py')

# Allows to call script from command line
def execute(process):
    os.system(f'python3 {process} --count 100')

# Creating pool, change "process = #" for number of buoys
process_pool = multiprocessing.Pool(processes = 30)

# Execute all the scripts simultaneously
process_pool.map(execute, all_processes)
Changing the amount of messages per script is done by changing the “execute()” function.
def execute(process):
    os.system(f'python3 {process} --count 100')
Since each buoy script can be ran in CLI they can take optional arguments. Look into one of the buoy scripts for more details. The only one we’re interested in is the –count argument. Change the number to increase or decrease number of messages sent.
If you wish to increase or decrease the number of buoys we’re imitating, change the all_processes tuple. Either remove, or add additional scripts.
To add alter the buoy scripts, you can copy one of the existing scripts and alter it. Things you may want to change are the “sample_data” dictionary, the “generate_field_value()” function, and the “generate_topic()” function
sample_data: sample_data = { “do”: 0.0, # Dissolved Oxygen Sensor (%Sat) “ec”: 0.0, # Electrical Conductivity Sensor (ms/cm) “liqlev”: False, # Liquid Level Sensor (boolean) “ph”: 0.0, # PH Sensor “tds”: 0.0, # Total Dissolved Solids Sensor (ppm) “tbd”: 0.0, # Turbidity Sensor (NTU) “wf”: 0.0, # Water Flow Sensor (L/s) “wp”: 0.0, # Water Pressure Sensor (kpa) “temp”: 0.0 # Temperature Sensor (Degree C) } Please note, sample_data values should stay either as floats or strings. Integer values will not be properly stored in timestream.
generate_field_value():
def generate_field_value(field: str):
    return round(sample_data[field] + sample_data[field] + counter, 2)
You can alter how the initial values change with this function
generate_topic():
def generate_topic():
    buoy_id = 100
    return f"aws/0/{buoy_id}/data/"
Change buoy_id to send to a different topic.
Findings
The test did not find any limitations when having data flow from IoT Core to Timestream as all 27000 measures were found in the database.
However there were some limitations when having data go through kinesis to our S3 bucket.
Kinesis
Our maximum theoretical throughput (according to AWS) for kinesis is 1000 records/1 second OR 1MB/1 second. We also know that each message is roughly 100 Bytes we can calculate our throughput.
27000 Records / 100 Seconds = 270 Records / 1 Second, so the record limitation isn’t close to being met.
(270 records / 1 Second) * 100 Bytes = 2700 Bytes / 1 Second or 2.7KB / 1 Second, again, the data limit isn’t being close to being met.
Kinesis isn’t the issue.
S3
Looking into S3, you can see the data coming in, and error logs suggesting what the error can be. Upon forther inspecting of the error logs, we see ‘“errorMessage”:”The Lambda function invocation timed out. Increase the Timeout setting in the Lambda function.”’
Looks like the lambda function we use to convert the MQTT message into a JSON is the culprit.
Lambda
We can make changes to the Timeout as suggested. Doubling it did seem to alleviate the issue and more data is flowing but there is a longer delay from when the data is created to when the data enters the S3 bucket.
To increase the timeout, go to the Lambda dashboard, on the left hand navigation menu, click on “Functions”
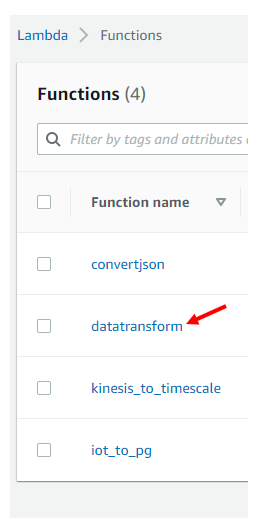
Find the function we wish to adjust. In our case, “datatransform”, just click on the function name to be brought to its’ function over page.

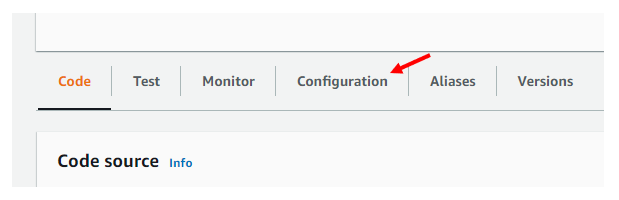
Once at the function overview page, we can click on “Configurations” located just below the Function overview and above the Code Source section.
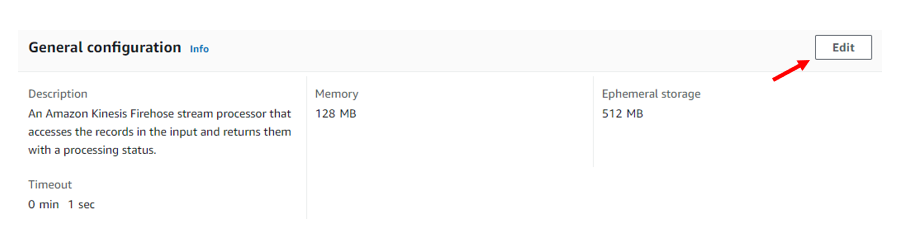
In the “General configuration” box, click on “Edit” just located on the right-hand side to get to the “Edit Basic Settings” page
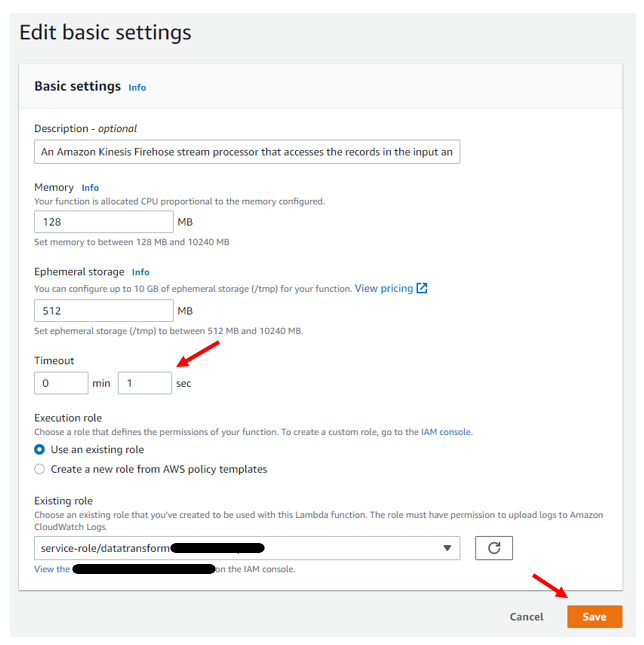
Within the “Basic Settings Page” scroll down until you see the timeout section. You can increase the value to whatever you wish then click on the orange “save” button.
Conclusion
Due to the requirements to keep things as fast as possible, I’ve left it at the lambda function’s timeout alone (what it was originally).
The stress test was testing more than double the capcity of what we’re currently expecting (14 buoys), maybe if the number of buoys needed to be increased should we look at this again.
Future Considerations
If needed, and we can increase the timeout time for lambda function execution as our main source of data retention (timestream) is functioning perfectly. As S3 is our backup (for now, this may change when live data analysis is implemented) we can look into adjusting the timeout setting down the road.